Moisture-Busting Melodica!

The Problem
There’s the cue for my melodica solo, here we go! Let’s start with some noodling around over the chords… so far so good, I see some smiles out there… ok, let’s build the tension… ok, time to lay down that bluesey Eb at the crescendo, here goes…
OH NO, WHY THE $%#^ WON’T IT PLAY ???? ! ! ! !
That has happened to me on more than one occasion.
And on a related NOTE:
* Why does my instrument go out of tune so fast??? * Why are my reeds rusty? * I feel like I’m snorkeling, the way moisture collects in this blow tube! * Why did that C# sound weird and then sound normal again? * Why does my built-in microphone work erratically? * Why can’t I get through a recording session without one or more of the reeds choking? * Why is playing in cold weather is such a pain??? *
Common theme: MOISTURE! H2O! Condensation! Saliva! Spit!
Here’ what the lower reed plates of my Hammond Pro 44 look like after a workout:

In the image below, the yellow arrows point to regions where moisture has wicked into gaps between the reed and the reed plate, preventing these reeds from playing until the moisture is blown out somehow.

The image below shows the plastic diaphragm at the far end of my Hammond Pro44HP. You can see it is full of water. This diaphragm keeps the microphone from getting wet, but when full of water, it probably is not coupling sound very well.

The more I have played, the more I have been vexed by the problems I listed above. An informal survey of other melodicists showed that I am not alone! One expert offered the strategies he listed below. Another said “I think about this on a daily basis!”

I’m a mechanical engineer and I set a goal for myself of minimizing or eliminating this problem.
My approach
Here are some of the possible approaches I thought of, or others in the melodicist community had tried or suggested or considered:
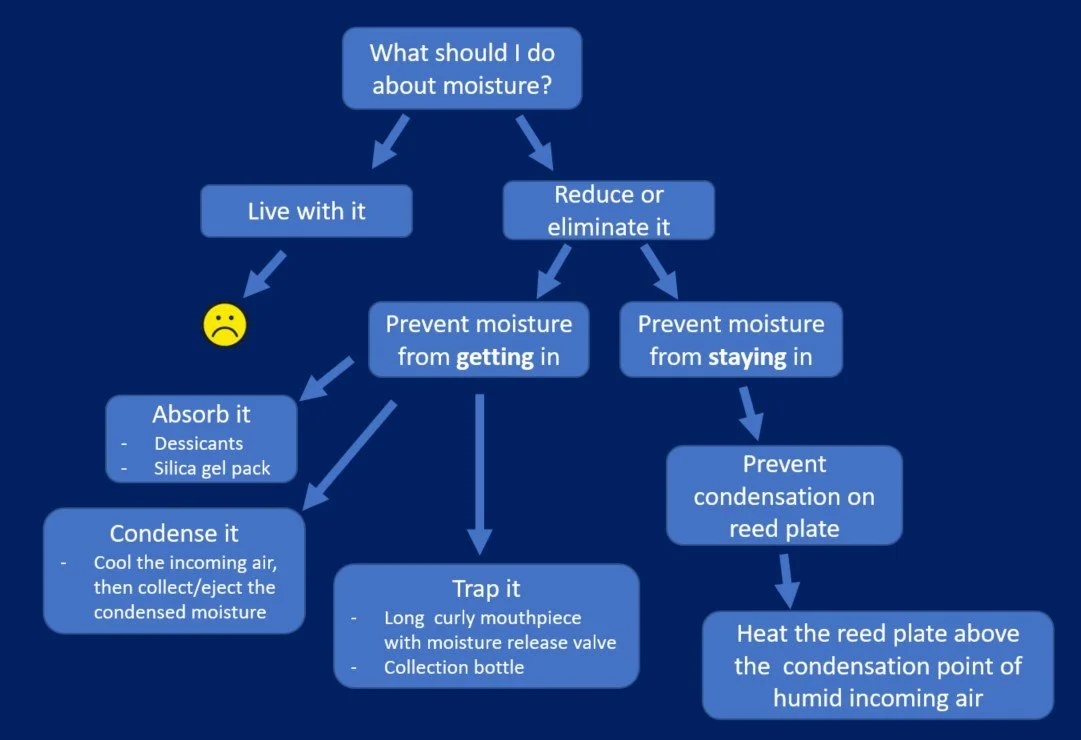
All of these options could conceivably work, but some will be far more practical than others. Absorption might require a large amount of dessicant. A condenser might need lots of power. I decided to try a simple moisture trap first, since that seemed easiest to try. To test the concept, I purchased an air filter with a clear collection bowl- not exactly what I needed but easy to work with- and then took dimensions from it and then designed mouthpiece/tubing adapters for it and 3d-printed them.


Did it work? NO! Well, it definitely collected some moisture, but it definitely did not solve the problem. There was still plenty of condensation on the reeds. My guess is that it reduced the condensation by maybe 30-50%. Nice, but not enough. I wasn’t terribly surprised by this, because water vapor will pass right through the filter if it has not yet condensed. Also, the filter element was adding lots of resistance and it wasn’t clear it was filtering anything. My lungs are pretty clean to begin with.

Nope, still plenty of condensation on the reeds!
I decided to construct a reed-plate heater next. I purchased a spool of .010” (.25mm) diameter nichrome wire, and some kapton (polimide) tape. Nichrome wire is commonly used in electric heaters because of its high resistance to electrical current (I measured about 7 ohms per foot). I laid down an insulating layer of kapton tape along the length of one edge of the reed plate, cut a length of the nichrome wire, soldered insulated copper wire leads to each end, then taped it in place along the reed plate. Then I ran the leads out through one end of the reed chamber, drilled holes in one end of the instrument for a jack and a power-indicating LED, then closed it all up and connected it to a variable-voltage power supply.


Using a temperature probe and a multi-meter, I found that it only took about 6 watts to heat the reed plates to over 37 degrees C (8.5 volts and .7 amps). I was happy to see that because that meant it would run well on battery power. Finally, I played it for about an hour, and when I peeked inside…
THE REEDS WERE DRY!!!
Encouraged by this result, I got to work on a portable power supply. I purchased a hobby battery (Lithium Iron Phosphate because it is robust and safe) and a charger, and added a battery-management circuit (low-voltage cutoff) and a voltage regulator chip to bring the battery voltage down to my desired 8.5 volts. The battery I chose (2100 milli-amp-hours) would be sufficient to keep things hot for at least 3 hours. I designed and 3D printed more parts to mount the electronics. I added a voltage indicator, power switch, thermistor probe, and temperature indicator. I decided to leave the moisture-catcher in place as well to solve the problem of moisture (saliva, mostly) accumulating in the tube. I 3D printed more parts for that and a smaller aluminum collection bottle that could be easily unscrewed to drain it. I placed this at the lowest point in the tubing system. Here is the result! And since it reminds me of a ghost-catching weapon from the movie “Ghost-busters”, let’s call this the Moisture-Buster!


Possible Next Steps
1) I don’t find this arrangement physically uncomfortable with these protuberances on the back of the instrument, but I could see why others might. It could certainly be made more compact. The collection bottle could be a lot smaller. A smaller battery could be used, or it could be placed elsewhere.
2) The heater could be made “closed-loop.” This means it would have an on-board controller that continuously takes temperature measurements and then adjusts the power to maintain it. I know how to do this, but am not sure it’ necessary. It might be necessary for cold-weather playing, for example. For now I’ll keep checking the temperature meter to see if it’s maintaining the temperature I want.
3) More testing to confirm this is working as anticipated, and that the instrument is staying in tune.
4) Making this available to others- I’ll consider that if there is interest. It would take some effort to customize this for all the different melodicas out there.
COMMENTS WELCOME!!!